
EM-140 DG - External Flash SIGMA - Free user manual and instructions
Find the device manual for free EM-140 DG SIGMA in PDF.

| Product type | External macro electronic flash with automatic zoom head and adjustable TTL control |
| Brand | SIGMA |
| Model | EM-140 DG |
| Compatibility | Canon EOS SLR cameras (types A and B) |
| Guide number | 14 (ISO 100/m) |
| Power supply | 4 AA alkaline batteries or Ni-Cd/Ni-MH rechargeable batteries |
| Recycling time | Approx. 4 s (alkaline), 3 s (Ni-Cd/Ni-MH) |
| Auto power off | Yes, after 90 seconds of inactivity |
| Color temperature | Daylight |
| Dimensions (control module) | 76.7 mm (W) x 136.2 mm (H) x 82.4 mm (D) |
| Dimensions (flash module) | 126.6 mm (W) x 128.8 mm (H) x 30.5 mm (D) |
| Weight | 430 g (with batteries) |
| Main functions | ETTL/TTL auto flash, lighting ratio (8:1 to 1:8), manual flash (1/1 to 1/64), high-speed sync (FP), exposure memory (FE lock), predictive flash, exposure compensation (±3 EV), flash bracketing, stroboscopic mode (1-199 Hz, up to 90 flashes), wireless remote flash (master/slave), AF assist lamp, LCD backlight |
| Maintenance and cleaning | Clean with a soft, damp cloth; avoid solvents, benzene. Store in a dry, temperate place. Operate several times a month to maintain the capacitor. |
| Safety | Do not disassemble (high voltage), do not fire near eyes, avoid flammable environments, use only on Canon EOS cameras, protect from water, dust and shocks, do not expose to naphthalene or camphor. |
| Spare parts and repairability | Macro adapters available in diameters Ø55, 58, 62, 72, 77 mm (Ø55 and 58 supplied, others optional). Standard AA batteries. No specific spare parts mentioned; repair by authorized service. |
Frequently Asked Questions - EM-140 DG SIGMA
User questions about EM-140 DG SIGMA
0 question about this device. Answer the ones you know or ask your own.
Ask a new question about this device
Download the instructions for your External Flash in PDF format for free! Find your manual EM-140 DG - SIGMA and take your electronic device back in hand. On this page are published all the documents necessary for the use of your device. EM-140 DG by SIGMA.
USER MANUAL EM-140 DG SIGMA
Thank you for purchasing the Sigma Electronic FlashMacro EM-140 DG. The advanced features of this flashgun allow you to enjoy AF Macro photography. Depending on the camera model, functions and operation may vary. Please read this instruction booklet carefully. To add to your enjoyment of photography, the flash has a variety of features. To make the most of all these features, and to get the maximum performance and enjoyment from your flash, please read this instruction booklet, together with your camera's instruction manual, before using the flash, and keep it handy for future reference. (This Flashgun is exclusive for Canon EOS series cameras)
PRECAUTIONS
In order to avoid causing any damage or injury, please read this instruction manual very carefully, paying attention to the cautionary signs below, before using the flash. Please take special note of the two cautionary signs below.

Warning !!
Using the product disregarding this warning sign might cause serious injury or other dangerous results.

Caution!!
Using the product disregarding this caution sign might cause injury or damage.

Symbol denotes the important points, where warning and caution are required.
Symbol contains information regarding the actions that must be avoided.

Warning !!

This flash contains high voltage circuits. To avoid electric shock or burns, do not attempt to disassemble the flash. If the outside shell of the unit is broken or cracked, do not touch the mechanism inside.

Do not fire the flash close to eyes. Otherwise the bright light could damage the eyes. Keep at least 1m/3feet distance between face and the flash unit, when taking a picture with flash.

Do not touch the synchro terminal of your camera when the flash is attached to hot shoe. High voltage circuitry could cause electric shock.

Never use your camera in an environment where flammable, burnable, gas, liquids or chemicals, etc, exist. Otherwise, it might cause fire or explosion.

Caution !!

Do not use this flash unit on any camera other than the Canon EOS series cameras; otherwise the flash may damage the circuitry of these cameras.

This flash unit is not waterproof. When using the flash and camera in the rain or snow or near water, keep it from getting wet. It is often impractical to repair internal electrical components damaged by water.

Never subject the flash and camera to shock, dust, high temperature or humidity. These factors might cause fire or malfunctioning of your equipment.

When the flash is subjected to sudden temperature change, as when the flash unit is brought from a cold exterior to warm interior, condensation might form inside. In such a case, place your equipment in a sealed plastic bag before such a change, and do not use the flash unit, until it reaches room temperature.

Do not store your flash in a drawer or cupboard etc., containing naphthalene, camphor or other insecticides. These chemicals will have negative effects on the flash unit.

Do not use a thinner, Benzene or other cleaning agents to remove dirt or finger prints from the component. Clean with a soft, moistened cloth.

For extended storage, choose a cool dry place, preferably with good ventilation. It is recommended that the flash be charged and fired several times a month, to maintain proper capacitor functioning.
Flash Unit
1.Left Flashtube
-
Right Flashtube
-
Auxiliary Light
-
Release Tab
5.MacroFlash Adapter
Controller Unit
6.LCD Panel 7.Battery Cover
8.Shoe Ring 9.Shoe
10 MODE Button
-
SELECT Button
-
- Increment Button
-
- Decrement Button
14.LAMP Button
15.TEST Button
-
Light Button
-
Ready Light
18.Power Switch
LENS USABILITY
Although this Flash is designed specifically for Macro lenses (MACRO 50mm F2.8 EX DG, MACRO 105mm F2.8 EX DG, etc.) it is also possible to use it with other lens types, however please pay attention to the following points.
Front part or other parts of some lenses rotate while focusing, and also attaching the ring flash to such lenses would affect focusing mechanism of your camera, possibly resulting in malfunction. Please use Manual Focus only with such lenses.
055mm, and 058mm filter MacroFlash Adapters are bundled with your flashgun. If you want to attach your flashgun to a lens which has a different filter size then please purchase separately a MacroFlash Adapter. (Only 62mm, 72mm, 77mm macroflash adapters are available).
Depending on the lens' focal length or the distance to subject or another reason, it is possible that your image might be affected by vignetting. Please take some test shoots first to be sure that your setting is not causing vignetting.
CAMERA MODELS AND FUNCTIONS
Although this Flash unit has been equipped with numerous functions, depending on the camera model being used some functions may have some limitations. Please confirm the type camera you have from the list below. Please refer to explanations of each function through the instruction manual; If no model information is specified, it means that this function of flash can be used with all type of EOS cameras.
| A type camera | E-TTL, E-TTL II compatible cameras |
| B type camera | All other EOS cameras except those listed above |
ABOUT THE BATTERY
This flash unit uses four "AA" type Alkaline dry cell batteries or Ni-Cad, Ni-MH, rechargeable batteries. Manganese batteries can also be used but as they have a shorter life than Alkaline batteries, we do not recommend using them. Please replace batteries if it takes more than 30 seconds to light the Ready Lamp.
To assure proper electrical contact, clean the battery terminals before installing the batteries
NiCad batteries do not have standardized contacts. If you use NiCad batteries, please confirm that the battery contacts touch the battery compartment properly.
To prevent battery explosion, leakage or overheating, use four new AA batteries of the same type and brand. Do not mix the type or new and used batteries.
Do not disassemble or short-circuit batteries, or expose them fire or water; they may explode. Also, do not recharge the batteries other than Ni-Cd rechargeable batteries.
When the flash will not be used for an extended period of time, remove the batteries from the flash, to avoid the possibility of damage from leakage.
Battery performance decreases at low temperatures. Keep batteries insulated when using the flash in cold weather.
As with any flash, it is recommended you carry spare batteries when on a long trip, or when photographing outdoors in cold weather.
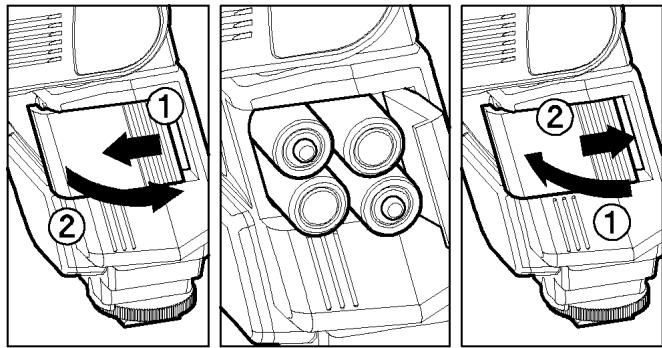
- Be sure to set the Power Switch to the off position then slide, the battery cover in the direction of the arrow to open.
- Insert four AA size batteries into the battery chamber. Be sure the + and - ends of the batteries are aligned according to the diagram in the chamber.
- Close the cover.
- Slide the Power Switch to the ON position. After few seconds, the Ready Lamp will light, indicating that the flash unit can be fired.
- Please press the "Test Button" to be sure that the flash is working properly.
AUTO POWER OFF
To conserve battery power, the flash unit automatically turns itself off when the flash is not used within approximately 90seconds. To turn the flash on again, depress the "TEST" button or the camera shutter button, halfway. Please note that, "Auto Power Off" mechanism does not work with wireless TTL flash mode, normal slave flash, and designated slave flash modes.
ERROR INDICATION
If the battery power is not sufficient or there is electric information error between the camera and flash unit, the "Flash Coverage Angle" will blink on the LCD panel. When this occurs, turn the power switch off and on. If it still blinks, after this procedure, check the battery power.
ATTACHING THE CONTROLLER UNIT
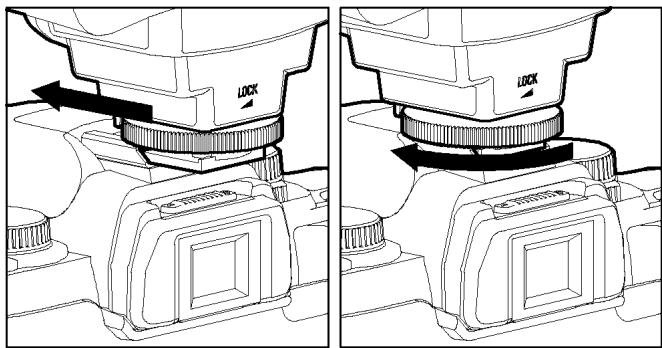
Be sure turn off the Power Switch. Then insert the Shoe Base into the hot shoe on the camera and turn the Shoe Locking Ring until it is tight.
When you attach or remove the flash, grasp the bottom of the flash to prevent damage to the shoe foot and camera's hot shoe.
If the camera's built-in flash is set in up position, please close it before you attach the flash unit.
To remove the flash, rotate the shoe-locking ring in the opposite direction of LOCK mark, until it stops.
ATTACHING THE FLASH UNIT
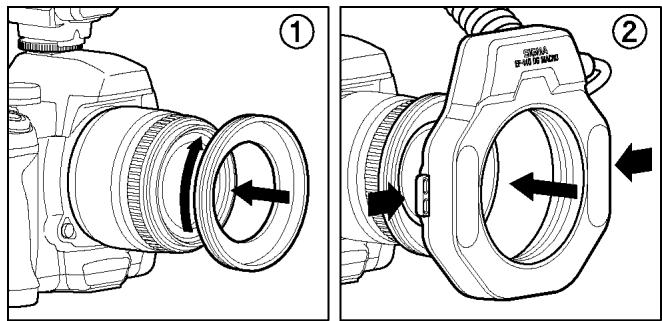
- Attach the MacroFlash adapter to the lens' filter tread.
- While pressing the left and right release tabs on both sides of the holder, place the flash unit over the adapter, then release both tabs.
You can adjust the position by rotating the flash unit.
Press the release tab when you detach the unit from the lens.
LCD PANEL ILLUMINATION
When you press the LIGHT button, the LCD panel will illuminate for about 8 seconds. The illumination stays on longer than 8sec, if you press the LIGHT button once again.
Auxiliary Light
If LAMP button on the Flash Units is pushed, the auxiliary light will emit for 20 seconds. In a dark place, it will be easy to focus by using the auxiliary light. This fuction is very convenient when composing pictures where auto focus does not operate well or where focus adjustment in manual is difficult.
If the shutter button is depressed it will stop working.
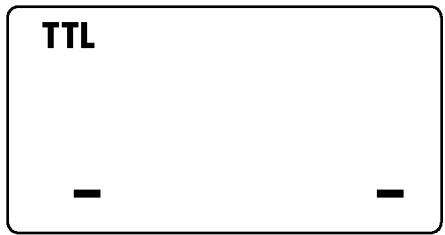
In the TTL AUTO Mode, the camera will control the amount of flash lighting to get the appropriate exposure for the subject.
"A" type cameras can be set in ETL mode. "B" type cameras can be set in TTL mode.
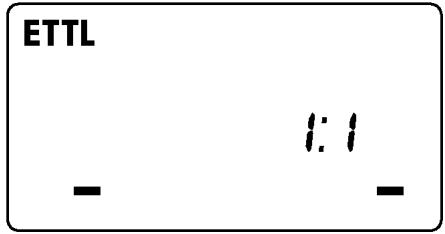
- Set the camera's mode to Full-AUTO Mode. ( Usually Mode. If the camera does not have Mode, set to P Mode.) A type (E-TTL)
- Turn on the power switch of the flash, the ETTL (TTL) mark will appear on the LCD panel and flash will start charging.
- Focus on your subject.
- Press the shutter button, after the flash is fully charged.
Note: When the flash is fully charged, the ready light in the viewfinder appears.
When the camera receives the appropriate exposure, the ETLT (TTL) mark on the LCD panel will appear for 5 seconds. If this indication does not appear, the flash illumination is not sufficient for that situation. Please re-take the picture at a closer distance.
When the camera is set to Creative Zone, please remember that the flash will be set to the last chosen mode each time.
When the flash is fully charged, the flash mark will appear in the finder. If the shutter is released before the flash is fully charged, the camera will take the picture at a slow shutter speed, with no flash.
A type (E-TTL)
B type (TTL)
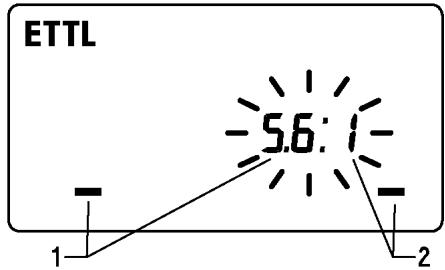
It is possible to give the three dimensional effect to your pictures by adjusting the flash ratio of left or right flash tube or by firing only one side of the flash.
A Type Cameras
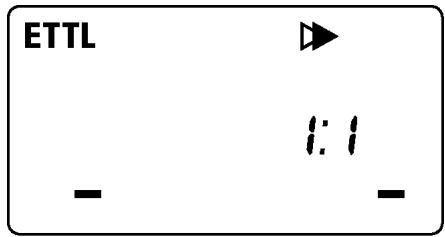
- In the ETL mode, the flash ratio blinks when you press SEL button.
- Press the + or - button to set the flash ratio.
Pressing + button will increase the left flashtube and pressing - button will increase the power amount of the right flashtube. The ratio can be set up among 8:1~1:8. Press A type (E-TTL) the + or - button to trigger only one side. (flash ratio will not be displayed and only firing side will blink) ETL
- Press the button several times to stop the blinking.
If the flash ratio is set to 1:1 or the mode is changed, this function will be cancelled.
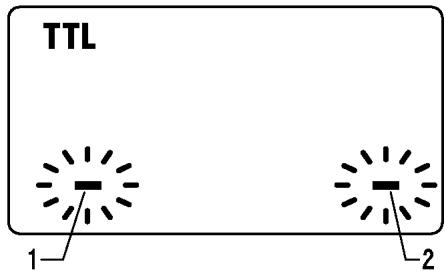
B Type Cameras
Flash ratio cannot be set. Only one side can be set.
1. In the TTL mode, press the SEL button to make the Flash Unit display blink.
2. By pressing the + button, the left flashtube will fire, and by pressing the - button, the right flashtube will fire. (Only the firing side will blink on the flash unit display)
3. Press the SEL button several times to stop the blinking.
After shooting please press button and then the + or - button. By doing this flash unit will be set to default mode, display will show both sides.
A type (E-TTL)
B type (TTL)
USING FLASH IN OTHER CAMERA MODES (Except EOS700, 750, 850) Shutter Speed Priority Setting
By selecting the Tv mode of the camera, you can set the shutter speed from 30sec. to 1/X sync speed. When you set the desired shutter speed, the camera will select the appropriate aperture value for the background. If the subject is too light or too dark, the aperture value indicator will blink and show the limit values (maximum or minimum aperture). In such as case, the camera proceeds to take flash photograph at the limit value. Thus, the main subject in the picture may be exposed correctly, but the background will become under or over exposed.
Aperture Priority Setting
By selecting the Av mode of your camera, the camera will select the appropriate shutter speed for the background. If the subject is too bright or too dark, the shutter speed indicator will blink and show the limit highest or slowest shutter speed value. The highest shutter speed will be limited to the camera's normal flash synchronization speed. In such a case, the camera proceeds to take a flash photograph at the limit value. Thus, the main subject in a picture may be exposed correctly, but the background will become under or overexposed.
When used with M Mode
You can set the desired shutter speed and aperture value. The sync speed of camera is 30sec. If you adjust exposure according to the exposure meter indication, the camera will work as for Daylight synchronization flash or slow synchronization.
LIMITS OF CONTINUOUS SHOOTING
To prevent overheating of the flash's circuitry, please do not use your Flash unit for at least 10 minutes after using the number of flash exposures, shown in the below table have been made in quick succession.
| Mode | Number of Flash Exposures |
| TTL, M(1/1,1/2) | 15 Continuous Flash Shots |
| M(1/4, 1/8) | 20 Continuous Flash Shots |
| M(1/16-1/32) | 40 Continuous Flash Shots |
| Multi | 10 Cycle |
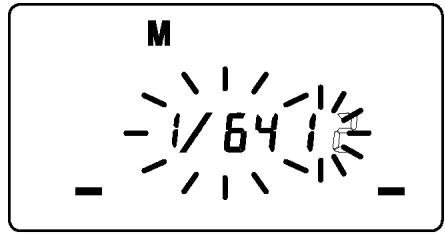
Manual flash provides adjustment of desired flash intensity (flash output level).
This mode cannot be used with EOS 700, 750, 850 cameras.
The shooting in Manual Mode requires a very advanced technique. We recommend you use the Auto mode. When using Manual Flash photography, first take some test shots. It will be beneficial to use a flash meter device for determining the exposure.
Flash intensity of left and right tubes can be set between 1 / 1 1 / 64 . It is also possible to set without firing one of them.
1. Set the camera's exposure mode to M.
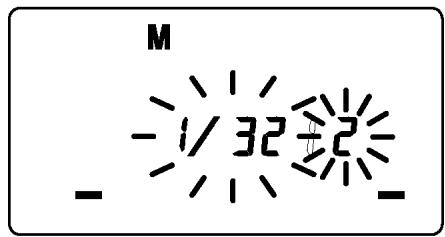
2. Press the MODE button on the flash unit to select M.
3. Press the SEL button. (The flash intensity display of the left flashtube blinks).
4. Press the + or - button to set the left flashtube output level. (If -- " is displayed, the left flashtube will not fire).
5. Press the SEL button. (The flash intensity display of right flashtube will blink).
6. Press the + or - button to set the right flashtube output level. (If -- " is displayed, the right flashtube will not fire).
7. Press the SEL button to stop the indicator blinking.
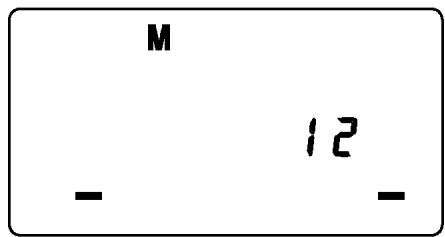
If the flash output level values of both tubes are the same, the flash output level will be displayed. When the different flash intensity is set, the flash output level will not be displayed on the LCD.
Regarding Guide Number, please refer to the [Table.1] on the last page.
You can calculate the correct exposure by using the following formula: Guide Number “GN” / Flash to Subject Distance = F-stop
SECOND CURTAIN SYNCHRONIZATION
When you photograph a moving subject with slow synchronization, usually the furrow of the subject will be exposed in front of the subject. The ordinary flash light will fire when the first shutter curtain is fully opened, thus the subject will be exposed from the time flash is fired to the time the shutter is closed (First curtain synchronization). When you use second curtain synchronization, the flash will fire just before the second curtain begins to close, and the subject will be exposed by ambient light from the time the shutter opens until the flash fires. As a result the furrow of the subject will be recorded behind the subject. It will be a more natural effect.
This mode cannot be used with EOS 700, 750, 850 cameras.
1. Set the desired picture-taking mode of the camera
2. Press + or -, button mark will be displayed on the LCD panel.
3. Adjust the focus, and take the picture after confirming the ready light.
First curtain synchronization will be set, if mark is not displayed.
If the camera is set to Full Auto Mode this function cannot be used.
To cancel second-curtain synchronization, turn off the mark on the LCD panel by using + or - buttons.
HIGH SPEED SYNC (FP) FLASH, (A TYPE CAMERAS ONLY)
When you take a picture with an ordinary flash, you cannot use a shutter speed faster than the camera's synchronized speed, because the flash must fire when the shutter curtain is fully open. The High Speed Sync keeps firing while the shutter curtain is running. Thus you can use a shutter speed faster than the
shutter's normal synchronized speed.
1. Select the camera's exposure mode. ("Tv" or "M" modes can be used)
2. Select a shutter speed faster than the camera's normal synchronized speed.
3. Slide the Power Switch of the flash to the ON position.
4. Choose the Flash Mode by using MODE button ("ETTL" or "M" modes can be used).
5. Press + or - button until the FP mark is displayed on the LCD panel.
6. Focus on the subject
7. Confirm the _H mark in the viewfinder of the camera, and then you can take the picture.
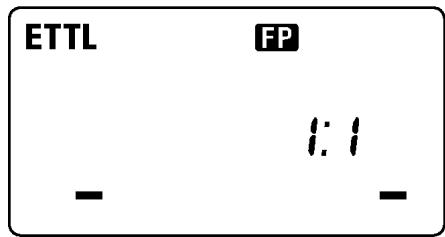
With high-speed sync, the Guide Number changes depending on the shutter speed. The flash range will be shorter (ie Guide Number will be smaller) when shutter speed is faster. (Please refer to table2 on the last page).
Selecting shutter speeds slower than the camera's normal synchronized speed cancels Hi-speed sync. Then the flash will automatically set to normal ETTL operation. To activate FP flash again, follow the procedure (No.1) for High speed sync (FP flash) described in this instruction manual.
It is possible to use exposure compensation function, with high speed synchronization operation. To do so, please refer to your camera's instruction manual regarding "exposure correction".
FP will disappear when Hi-speed sync (FP Flash) is cancelled.
FE LOCK
"FE" lock mode allows you to choose exposure for the part of the viewfinder, and lock it in, before taking the picture.
- Set the camera's exposure mode ("P", "Tv", "Av", "M" or "DEP").
- Set the flash's mode to the E-TTL or the High Speed Sync.
- Focus on the subject
- Focus on the subject in the center AF frame of the viewfinder, and depress FE lock button.
The flash unit will make a pre-flash and calculate and memorize, the amount of light necessary for correct exposure.
The camera's viewfinder will display "FEL" for 0.5 sec and the correct exposure will be set.
If the viewfinder shows mark, it means that power is not sufficient for correct exposure. Please get closer to the subject and repeat from step 3.
- After composing the picture, press the shutter button.
Depending on the camera model, there are some differences in using FE lock. Please refer to your camera's instruction manual on the subject "FE lock mode".
MODELING FLASH
The modeling flash is used to check for shadows and light balance on the subject before taking a picture.
Flash Ratio of Modelling Flash
It can be used with EOS-1D series, 1V, 3, 7, D30, D60, 10D, 20D, Kiss Digital (300D).
When the camera's preview button is pressed, it will fire the Flash unit according to the selected flash ratio setting.
Uniform Modelling Flash
This feature can be used with all EOS cameras.
- Press the + or - button several times to make the MODEL icon on the LCD panel appear.
- Confirm that the flash is charged, and then press the TEST button to fire.
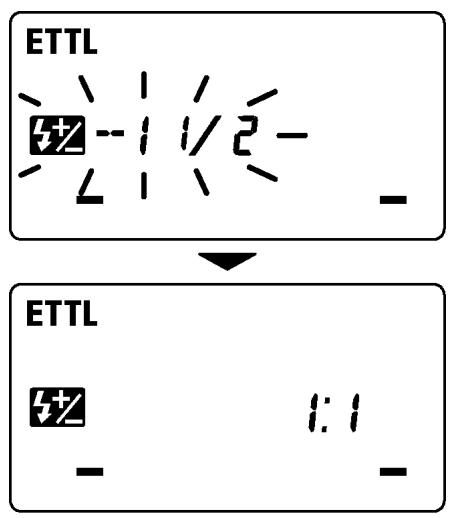
EXPOSURE COMPENSATION
You can use flash exposure compensation in combination with normal exposure compensation (to control the background exposure level) in flash picture. Flash exposure compensation can be set 1/3 stops in ± 3 -stop increments (or in 1/2 stop increments with some cameras).
This mode cannot be used with EOS 620, 650, 700, 850 and 1000 cameras.
- Press the SEL button and select
- Press the + or - button to set the desired flash exposure compensation amount.
- Display will stop blinking and remain displayed, after pressing the SEL button again.
- Focus on the subject.
- You can take the picture after confirming that the Ready Light of the flash is illuminated.
To cancel exposure compensation, please start from step 1 and choose +0 on display.
FB (Flash Exposure Bracketing)
With FB, you can get bracketed flash shots of the subject, while the ambient exposure level remains constant. The bracketed flash shots can be taken in the sequence of correct exposure, under exposure and over exposure, up to ± 3 stops in 1/3EV increments (or 1/2EV increments with some cameras).
- Press the SEL button; F b mark will blink.
- Press the + or - button to set the flash exposure bracketing amount.
- F will be displayed after pressing the button again.
- Adjust the focusing
- Check through the viewfinder and confirm the flash charged mark, and take the picture. (it will be displayed as F_2 at second shot and F_3 at third shot)
- If it is necessary, repeat steps 4 to 6.
This function will be cancelled automatically after making the third exposure.

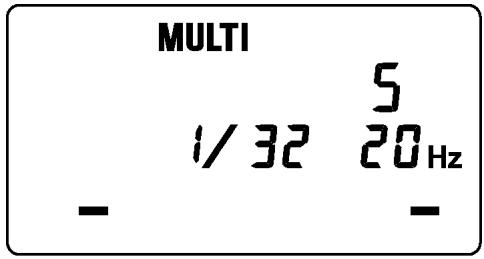
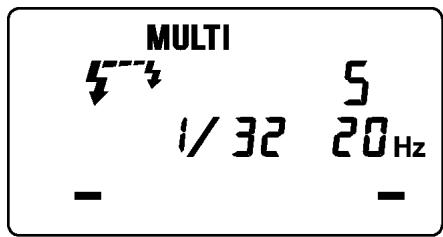
MULTI FLASH MODE
While the shutter is open, the flash will fire repeatedly. By doing so a series of images of the subject will be exposed in one frame. A dark background with a bright subject shows more effectively in this mode. It is possible to set the firing frequency between 1Hz and 199Hz. Up to 90 flashes can be fired continuously. The maximum number of flashes varies, depending on the flash guide number and firing frequency settings.
(Pleasesereferto table3onthe lastpage).
This function cannot be used with EOS 700, 750, 850 cameras.
- Set the camera's exposure mode to M mode, and set the F number
- Press the MODE button until the Multi-flash mode appears
- Press the SEL button until the flash firing frequency starts to blink.
- Press the + or - button to set the desired flash frequency value.
- After pressing the SEL button again, the flash power level will blink.
- Press the + or - button to set the desired power level.
- Press the SEL button again, the number of flashes will blink.
- Press the + or - button to set the desired number of flashes.
- Press the SEL button again, the display will stop blinking.
- When the ready light of the flash is illuminated, the unit is ready to use.
Note: Please set the shutter speed longer than; Number of Flashes you want ÷ Firing Frequency
WIRELESS FLASH
It is possible to use Wireless Flash photography if this flash unit is used as the master, and EF-500 SUPER EOS (EF-500 DG SUPER) as the slave light source.
The camera models of B type, can be used with "Wireless Manual Flash" and "Wireless Multi Flash" functions only. The EOS750 and EOS850 cannot be used with "Wireless Flash".
In this instruction, we call a flash unit, which is attached to the camera body "Master unit", and we call a flash unit at a remote position "Slave unit".
Set the distance between master and slave units less than 5meters.
Concerning the slave flash settings, please refer to slave flash's instruction manual (wireless photography section).
WIRELESSETTLFLASH
In this Wireless ETL Autoflash function, the camera automatically calculates the correct exposure.
Slave Unit Setting
- Follow the slave unit's instruction manual and set slaveID to 3.
- Place the Slave Unit at the desired position.
Master Unit Setting
- Press the MODE button to select the mark.
- After you confirm that both master and slave units are fully charged you can take the picture.
Wireless ETTL Auto Flash photography, high speed synchro (FP), FE lock, exposure compensation, and FB (Flash Exposure Bracketing) can be used together. After setting Wireless photography, please operate it according to each feature. Operation of the slave unit is not necessary.

After setting the left and right flashtubes' flash ratio, it is possible to set the compensation amount of slave (3) and take the picture.
- In the Wireless ETL mode, press the SEL button to make flash ratio value blink.
- Press the + or - button to set the flash ratio.
- Press the SEL button, exposure compensation of slave (3) will be blinked.
- Press the + or - button and set the flash exposure compensation amount.
- Press the SEL button several times to stop the blinking.
- After confirming that both master and slave units are fully charged you can take the picture.
Changing the mode cancels the setting.

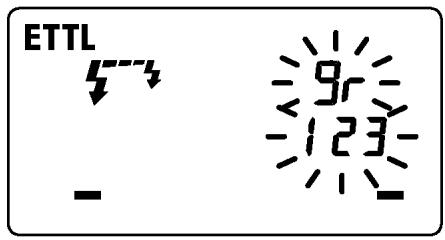
It is possible to group more than one slave flash unit and fire them according to the flash ratio adjustment of the master unit.
Slave unit's ID number 1 controls left flashtube (1), ID number 2 controls right flashtube (2). ID number 3 is controlled by exposure compensation amount. Each group does not have any restriction on the number of slave flash units.
Slave Unit's Setting
- Follow the slave unit's instruction manual and set slave ID to 1, 2, 3.
- Place the Slave Unit at the desired position.
Master Unit's Setting
- In Wireless ETTL mode, press the SEL button and select g_r .
- Press the + or - button to select 123
- Press the SEL button to make the flash ratio value blink.
- Press the + or - button to set the flash ratio.
- Press the SEL button to make the exposure compensation of the slave unit (3) blink.
- Press the + or - button and set the flash exposure compensation amount.
- Press the SEL button several times to stop the blinking.
- After you confirm that both the master and slave units are fully charged you can take the picture.
Changing the mode cancels the setting.

Wireless Manual Flash
You can manually set the wireless manual flash with the master unit. To determine the proper flash exposure, use a hand held flash meter.
Slave Unit's Setting
- Follow the slave unit's instruction manual and set the slave ID to 3.
- Place the Slave Unit at the desired position.
Master Unit's Setting
- Press the MODE button to select the mark.
- Press and hold the SEL button for more than 2 seconds to make the mode indicator blink.
- Press the MODE button on the flash unit to select M.
- Press the SEL button. The flash mode will be displayed.
- Press the SEL button once more and follow the procedure of Manual Flash, to set up each flash output amount.
Changing the mode cancels the setting.
It is possible to group more than one slave flash unit and fire them according to the flash ratio adjustment of the master unit.
The Slave unit's ID number 1 controls left flashtube (1), ID number 2 controls right flashtube (2). ID number 3 can be set by flash output amount.
Slave Unit's Setting
- Please follow slave unit's instruction manual and set the slave ID to 1, 2, 3.
- Place the Slave Unit at the desired position.
MasterUnit's Setting
- In Wireless ETL mode, press the SEL button and select the 9r .
- Press the + or - button to select 23 .
- Press the SEL button to make the indicator stop blinking.
- Press and hold the SEL button for more than 2 seconds to make the mode indicator blink.
- Press the MODE button on the flash unit to select M.
- Press the SEL button to make the mode indicator stop blinking.
- Press the button once more and follow the procedure of Manual Flash to set up each flash output amount.
Wireless Multi Flash
Slave Unit's Setting
- Follow the slave unit's instruction manual and set slave ID to 3.
- Place the Slave Unit at the desired position.
MasterUnit's Setting
- Press the MODE button to select the mark.
- Press and hold the SEL button for longer than 2 seconds to make the mode indicator blink.
- Press the MODE button on the flash unit to select MULTI.
- Press the SEL button to stop the mode indicator blinking.
- Press button once again, and follow the procedure of Multi Flash to set up each flash output amount.
Changing the mode cancels the setting.
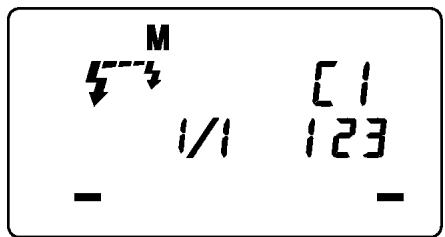
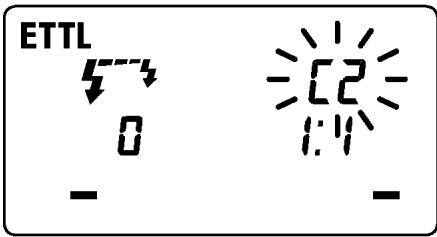
Channel Setting
In case other photographers are using Wireless Flash mode near you, your flash may be connected with anther person's flash unit and therefore may fire. In these circumstances, set a different channel for your flash from that of the other person's flash unit.
- In any of the Wireless modes, press the SEL button several times to make the channel indicator blink.
- Press the + or - button to set the channel number. (C1 ~ C4)
- Press the SEL button to make the indicator stop blinking.
- Follow the slave unit's instruction manual and set the channel number the same as the master unit.
SPECIFICATIONS
Guide Number : 14 ISO 100/m (when the flash is fired at full power)
Power Source : AA Alkaline Battery or AA NiCd Battery or AA Ni-Mh Battery x 4pcs
Recycling Time : about 6.0 sec. (Alkaline batteries)
: about 4.0 sec. (Ni-Cd, Ni-MH Nickel-Metal Hydride)
Angle of Coverage : Vertical / Horizontal 80 degrees
Weight : 430g (without batteries)
Dimensions (Controller): 76.7mm×136.2mm×82.4mm
Dimensions (Flash Unit): 126.6mm×128.8mm×30.5mm
DEUTSCH
MODALITÀ WIRELESS ETTL
The CE Mark is a Directive conformity mark of the European Community (EC).
DEUTSCH
- PRECAUTIONS
- Warning !!
- Caution!!
- Caution !!
- Flash Unit
- Controller Unit
- LENS USABILITY
- CAMERA MODELS AND FUNCTIONS
- ABOUT THE BATTERY
- AUTO POWER OFF
- ERROR INDICATION
- ATTACHING THE CONTROLLER UNIT
- ATTACHING THE FLASH UNIT
- LCD PANEL ILLUMINATION
- Auxiliary Light
- A Type Cameras
- B Type Cameras
- USING FLASH IN OTHER CAMERA MODES (Except EOS700, 750, 850) Shutter Speed Priority Setting
- Aperture Priority Setting
- When used with M Mode
- LIMITS OF CONTINUOUS SHOOTING
- SECOND CURTAIN SYNCHRONIZATION
- HIGH SPEED SYNC (FP) FLASH, (A TYPE CAMERAS ONLY)
- FE LOCK
- MODELING FLASH
- Uniform Modelling Flash
- EXPOSURE COMPENSATION
- FB (Flash Exposure Bracketing)
- MULTI FLASH MODE
- WIRELESS FLASH
- WIRELESSETTLFLASH
- Slave Unit's Setting
- Master Unit's Setting
- Wireless Manual Flash
- It is possible to group more than one slave flash unit and fire them according to the flash ratio adjustment of the master unit.
- MasterUnit's Setting
- Wireless Multi Flash
- Channel Setting
- SPECIFICATIONS
- DEUTSCH
- MODALITÀ WIRELESS ETTL
Brand : SIGMA
Model : EM-140 DG
Category : External Flash